
Every once in a while you find yourself in a situation, where you have to sign a document and send it. As long as you have a physical document, a pen and the post office is open, you’ll be fine. But what do you do when these conditions are not met? You can wait until the next day and hope you are not too late, or do it with ScanWritr right away.
How to sign documents on your phone/mobile device
Once you have either scanned or imported your document, here is how you do it:
● open ScanWritr and tap the document you need to sign
➢ main document edit screen opens
● tap the middle icon on the bottom bar (pen over a square)
➢ a pen/signature/marker menu opens
● tap the “signature” option
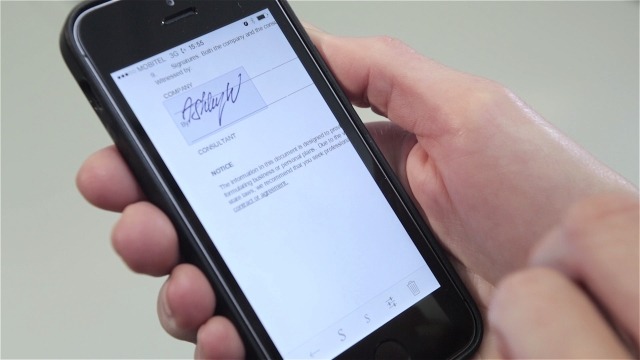
➢ your signature is slapped on your document
Now, if you have signed something with ScanWritr before, the signature appears on your document, so you just place it, resize it, if needed, save and there you are, your document is signed.
For the first time users
First time use of ScanWritr signature requires some more input from your user’s side, but the process is really easy.
If this is the first time you are signing documents in ScanWritr, then the dialog that opens is the signature configuration dialog. Here’s what you do. You have a choice of either sourcing your signature from an image file, scanning your signature with the device camera, or signing right on the touch screen.
If you have a nice stylish signature saved somewhere on the device:
● tap the “photo gallery” button on the bottom bar
➢ Your chosen photo gallery application starts
● choose the image containing your signature using a gallery or a file manager app
➢ the image is imported into ScanWritr, which enhances the signature and presents you with a crop interface
● set the crop limits of your signature on the picture
➢ you are all set now
● tap the checkmark in the top right corner
➢ the enhanced and cropped signature appears on your document
Sourcing the signature from a piece of paper
If you have a nice stylish signature on a piece of paper in front of you:
● tap the “Take Photo” button on the bottom bar
➢ a camera preview opens
● tap the camera icon
➢ your signature is photographed, enhanced and you are presented with a crop dialog
● adjust crop borders of your signature and tap the top right checkmark
➢ your signature is inserted into your document
Using the screen as an input for your signature
If you can produce a really nice, stylish signature on the touch screen:
● sign your name in the signature box and tap the top right checkmark
➢ your signature is inserted into your document
Finishing touch
When your signature is in your document, just finish the procedure:
● place your signature; touch it with your finger and drag it so the desired location
➢ the signature is where you need it to be
● resize your signature to the desired size using the large B and small B icons on the bottom bar
➢ your signature is now the correct size
● tap the X icon on the bottom bar to accept your signature
➢ you return to the main document edit screen
● tap the diskette icon on the right of the bottom bar to save your signed document
➢ you return to the main gallery
Now you can send your document via whichever channel suits you best, ScanWriter facilitates emailing your document, MMS (where available), exporting to image or PDF file, and faxing . Your signed document will be at the desired location in no time. Should you wish to change your signature later, you can do it by selecting it and tapping the settings icon and repeating the process.
Vanaia is here to satisfy your productivity-related needs. The home of ScanWritr, Productivity Blog and the world's first About YOU page.